How to Check Tank Armor Profile in Tyr: The Ultimate Guide to Penetration and Angling (Stoke Games)
Okay, real talk. I need to vent-slash-gush about something, because I’ve spent the last week of my life staring at 3D tank models instead of sleeping like a normal adult, and I regret nothing.
If you’ve been anywhere near the multiplayer scene since Tyr dropped its full launch this September, you already know Stoke Games didn’t just make ‘another tank shooter.’ They made a game that actively punishes you for playing like you’re in some twitchy arcade shooter from 2014. No more spray-and-pray. No more holding W and hoping. Tyr wants you to think, angle, and — this is the part that broke my brain a little — actually understand what your armor is doing at any given second.
And here’s the thing nobody tells you when you first boot this game up: you will bounce shots you were 100% sure should have killed someone. You will get deleted by a ‘weak’ light tank that somehow ate three of your rounds. You will rage-quit a match convinced the servers are broken.
They’re not broken. You just don’t know your armor profile yet. So let’s fix that.
Scavland Stuttering Fix: How to Stop Performance Hitching on Intel and NVIDIA RTX PCs
Why Armor Profiles Are Basically the Whole Game
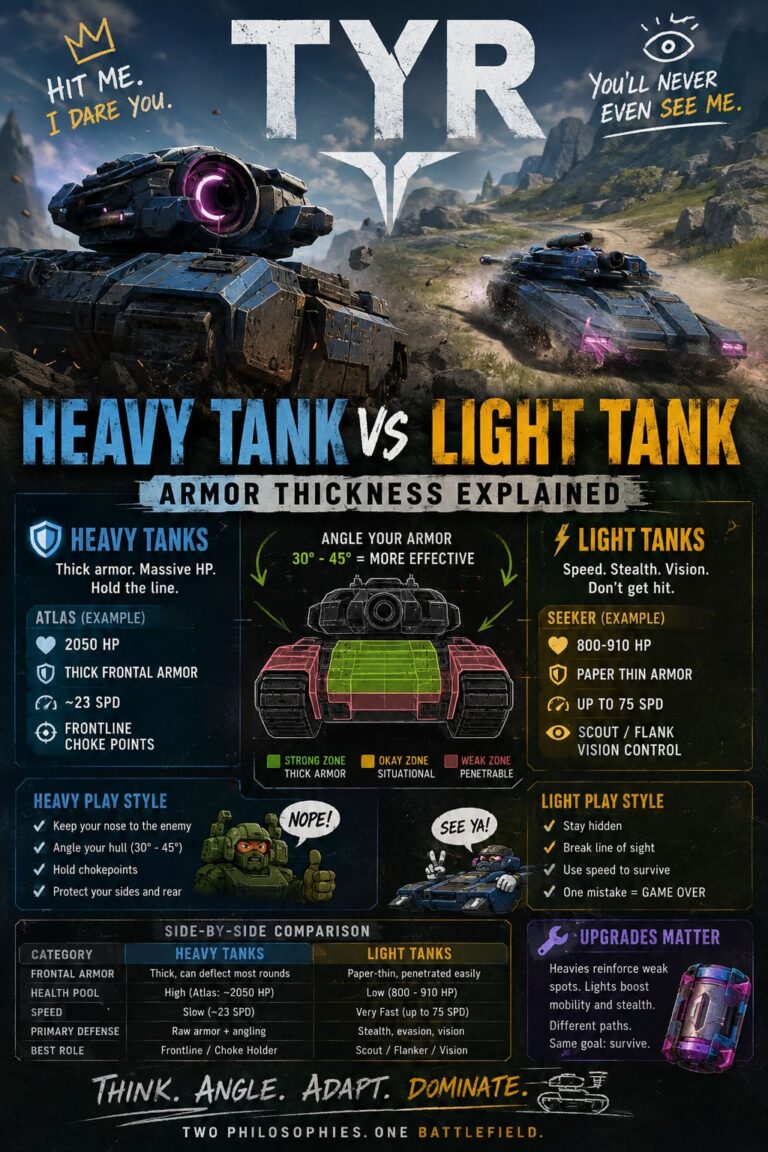
Here’s what took me embarrassingly long to internalize: Tyr isn’t running on some generic health-bar system where a hit is a hit is a hit. Every single vehicle — from the twitchy little Seeker and Phantom scouts to the absolute unit that is the Atlas heavyweight, plus the Fortis and everything in between — has an actual, physical armor layout. Front plates, side plates, rear plates, turret cheeks, the works.
And the game does this genuinely clever thing: it calculates the angle of impact, not just ‘did the shell touch the tank.’ Face someone head-on and flat? You’re eating their full nominal armor value. But the second an enemy angles their hull even a little, that effective thickness spikes — sometimes dramatically. Get a bad enough angle and your shot just… skips off. Zero damage. Doesn’t matter how strong your gun is on paper.
Once that clicked for me, I stopped blaming the game and started blaming my positioning, which, honestly? Much healthier mindset.

Method #1: The In-Game Garage Viewer (Quick and Dirty)
Stoke Games actually baked a decent inspection tool right into the client, and if you’re new, this is where you should start. Here’s the drill:
- Boot up Tyr and head into your Garage.
- Pick the vehicle you’re curious about — either from your owned roster, or by poking around the Tech Tree for tanks you haven’t unlocked yet.
- Once your tank is loaded up and spinning on the pedestal, look at the stats/inspection panel on the right.
- Hit the Armor Viewer (sometimes labeled X-Ray Mode) toggle.
- Boom — you get a color-coded or numerical overlay showing Front, Side, and Rear plate values.
It’s clean, it’s fast, and honestly for a quick ‘how tanky is this thing’ gut check, it does the job. But — and this is my one real gripe — it’s mostly static. It shows you baseline numbers, not how those numbers shift the second an enemy starts rotating in a real fight. For that, you need to go outside the game entirely.
Method #2: Tyr HQ — Where the Real Nerds Hang Out
Okay, this is the part where I get genuinely excited, because Tyr HQ (the community-built companion site that’s basically become required reading for anyone serious about ranked) does something the in-game viewer simply can’t: it lets you simulate combat.
I’m not exaggerating when I say this tool changed how I play. Here’s how to use it:
- Pull up Tyr HQ in your browser.
- Head to the Tools or Tanks section and pick your target — say, the Atlas, because everyone wants to know how to crack that thing open.
- Click into the Armor tab on that vehicle’s page. This loads a fully interactive 3D model.
- Hover or tap different zones on the hull and turret to get exact thickness readouts, plate by plate.
- Then — the good stuff — flip on Live View or Penetration Simulation mode. Pick an actual enemy gun and ammo type, and rotate the target tank live to see exactly when your shots start bouncing and when they start punching through.
That rotation feature alone is worth the visit. It’s the difference between reading a spec sheet and actually watching the mechanics play out in front of you.
Quick Comparison: Garage Viewer vs. Tyr HQ
| Feature | In-Game Garage Viewer | Tyr HQ |
|---|---|---|
| Access | Built into the client, instant | Separate site, browser-based |
| Data shown | Static Front/Side/Rear values | Full interactive plate-by-plate breakdown |
| Angle simulation | Not available | Live rotation + penetration simulation |
| Cross-vehicle testing | No | Yes — test any gun vs. any target |
| Best for | Quick sanity checks | Serious meta study / theorycrafting |
Honestly? Use both. The garage tool for a 10-second glance before a match, Tyr HQ for the deep homework sessions.

Turning All This Data Into Actual Wins
Here’s where I stop nerding out about numbers and start talking about what this actually means for your gameplay, because knowing the theory and playing well are two very different skills.
Side-scraping and hulldown are your new best friends.
If you’re rolling something like the Atlas — thick sides, but that lower front plate is basically made of cardboard — don’t just sit there facing the enemy head-on like a target dummy. Tuck behind a rock or building corner and back out at a tight angle. This is side-scraping, and it lets your beefy side armor eat shots while your fragile lower hull stays completely tucked away. Got a tank with a strong turret but a weaker hull instead? Find a ridge or dip and go hulldown — only expose the reinforced part.
Stop shooting center-mass like it’s 2015.
This one genuinely embarrassed me once I understood it. A lot of heavies have surprisingly weak lower front plates or tiny exposed hatches up top. If an enemy angles too hard around cover, go for their drive sprocket up front — it’ll usually pen and immobilize them, turning a tough target into a sitting duck for your team’s long-range damage.
Don’t be afraid to gear around your weaknesses.
Tyr’s tech trees and component slots exist for a reason. If your favorite medium tank feels underarmored against the current meta, that’s not a ‘reroll and cry’ situation — slot in reinforced plating or swap to a higher-penetration ammo type. It’s a legitimate, sanctioned way to patch up a bad matchup.
Common Weak Points Worth Memorizing
| Weak Point | Where to Find It | Why It Matters |
|---|---|---|
| Lower front plate | Most heavies, including Atlas-class | Thinner than the rest of the hull front |
| Drive sprocket | Front corners of the hull | Pen + track damage in one shot |
| Command cupola | Top of the turret | Small but consistently thin |
| Rear plate | Back of any vehicle | Almost always the weakest side overall |
My Honest Take (Because What’s a Fan Post Without Opinions)
Look, I’m genuinely obsessed with this system — it’s rare that a shooter this popular actually rewards understanding over pure reflexes. But I do think Stoke Games should consider surfacing a little more of this data natively, maybe a simplified penetration-preview overlay in matches themselves. Not everyone’s going to bother tabbing out to a companion site mid-session, and honestly some players are going to keep bouncing shots for weeks without ever discovering Tyr HQ exists. That’d be a shame, because once this stuff clicks, the game genuinely transforms.
Wrapping This Up
At the end of the day, Tyr isn’t a game where you win by clicking heads faster — it’s a game where you win by knowing things. Study your garage stats, then go run real angle simulations on Tyr HQ, memorize where the soft spots are on the tanks you fight most, and start playing the geometry instead of just the gunfight.
Do that, and I promise — the bounces stop feeling random, and start feeling like your fault, or better yet, the other guy’s. Go melt some Atlases. You’ve earned it.